BOM SKU (Bill of Materials)
Assign a main SKU that represents the complete SynSet. Useful for integrating with marketplaces like Amazon or Shopify.
SynSets allow you to group multiple individual SKUs and sell them together as a single unit. When a customer orders a SynSet, the system automatically deducts inventory from all included SKUs.
For example, you can create a “Gift Basket” that includes 3 chocolates, 2 candles, and 1 gift card. When someone purchases the Gift Basket, ShipEdge Core automatically reduces inventory of each individual item.
You can create SynSets from two locations:
Navigate to SKU Substitutions
Open Inventory SKU Substitutions from the Catalog toolbar (page title SKU Substitutions, vector icon in the header).
Click “Create” Button
Click Create in the page header.
Select Kits and continue
In the dialog New Item Subtitute, select Kits: Translate kits or bundles to components, then click Continue.
Configure the SynSet
The system will:
__temp_new_name__Navigate to Catalog
Go to Inventory.
Click the Three Dots Menu
Find the SKU you want as the first component and open the row menu (vertical ellipsis).
Create Synset
Click Create Synset from the dropdown menu.
Complete the modal
In the Create Synset dialog:
After creating a SynSet using either method, you’ll need to complete the configuration:
Complete basic fields
In the Edit Set (Synset) or Create Set (Synset) dialog (SKU Substitutions):
Add component SKUs
In the assigned-items grid:
Configure BOM SKU (Optional)
The BOM SKU (Bill of Materials SKU) is a main SKU that represents the complete bundle:
Save
Click Save. You must have at least one assigned item; otherwise the system shows It’s necessary to add at least one item.
Result
After a successful save:
Assign a main SKU that represents the complete SynSet. Useful for integrating with marketplaces like Amazon or Shopify.
Define the maximum allowed quantity for mixing or combining SKUs in the SynSet. Control your bundle’s flexibility.
Configure a specific shipping method for the SynSet, different from standard methods.
Add special packing instructions or attachments to guide warehouse staff.
Enable dividing SKUs into separate boxes during processing.
The BOM SKU is a main catalog SKU that represents the complete SynSet for integrations and reporting:
The Allow Division option gives warehouse operators flexibility when packing orders containing SynSets:
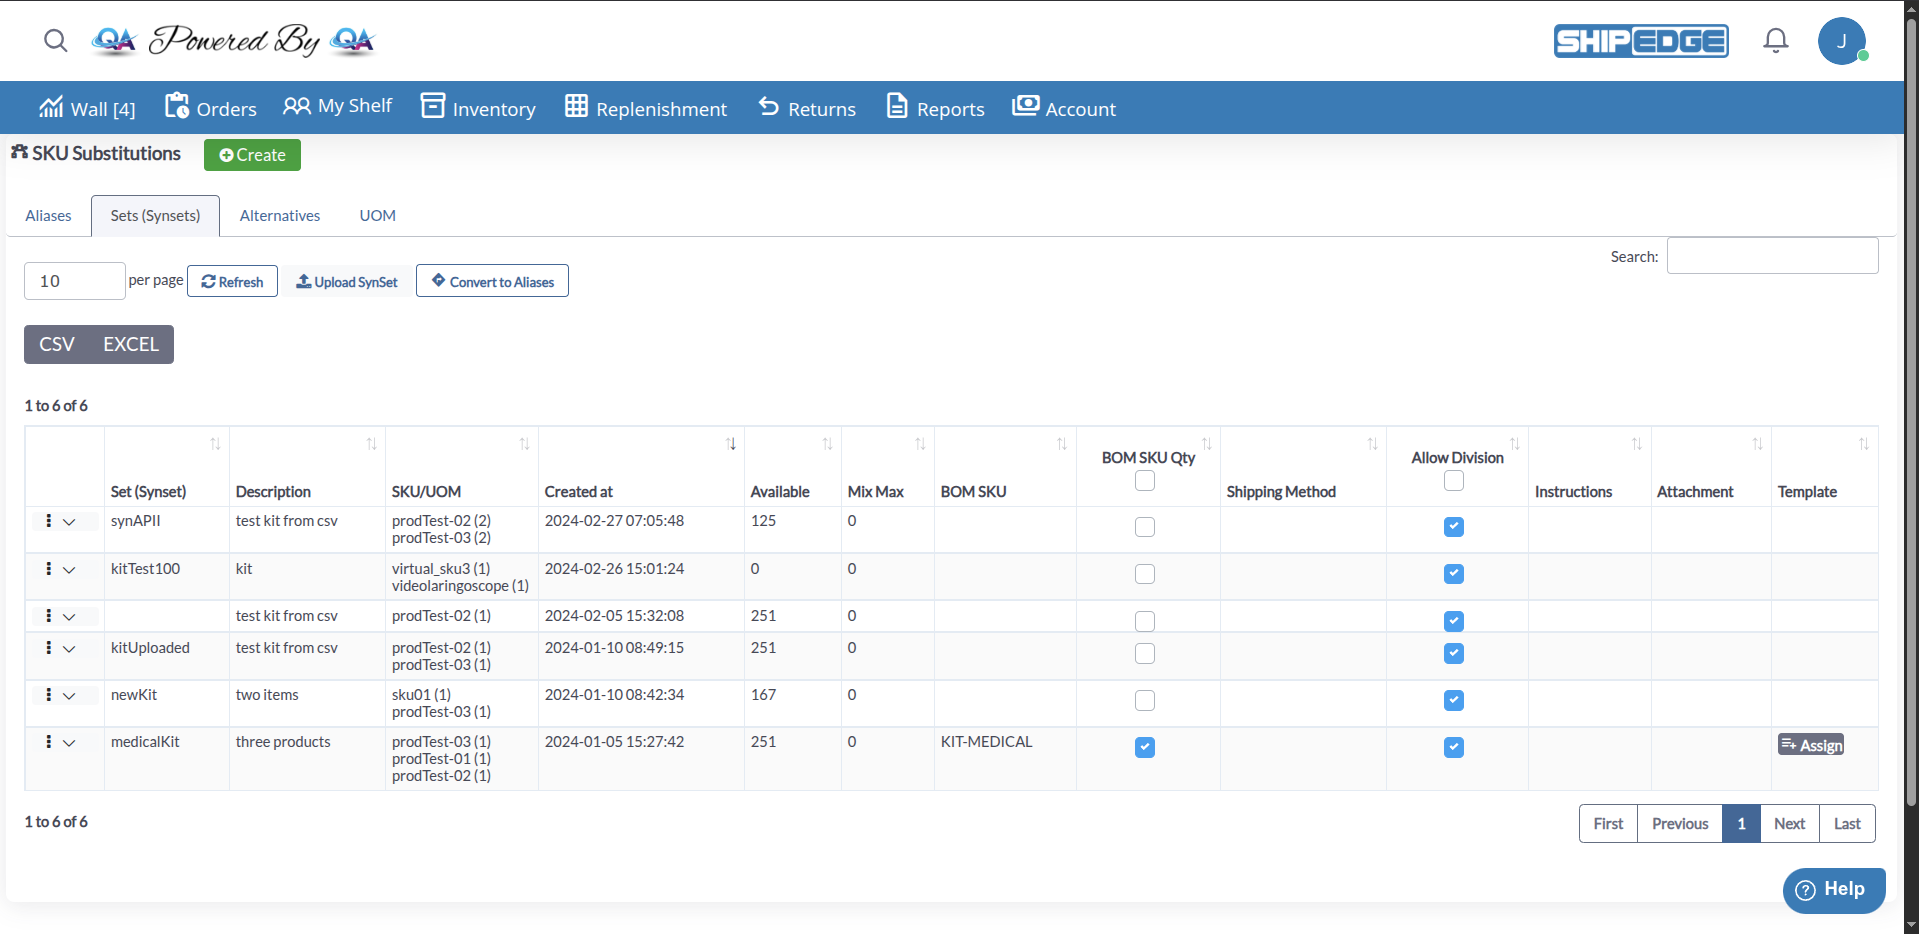
Open SKU Substitutions
Go to SKU Substitutions (from Catalog), then open the Sets (Synsets) tab.
Open Edit
In the SynSets table, use the row menu (vertical ellipsis) and click Edit.
Update fields
In Edit Set (Synset) adjust Name, Description, Mix Max, Bom SKU, BOM SKU QTY, Shipping Method, Allow Division, and (if manufacture is on) Instructions / Attachment as needed.
Add or remove components
Use Assign to add SKUs/UOMs; use the row remove control to remove a component from the set.
Save
Click Save.
ShipEdge Core allows importing and exporting SynSet configurations via CSV files from the SKU Substitutions interface.
You can export SynSets data directly from the SynSets table in SKU Substitutions:
Navigate to SKU Substitutions
Go to Inventory, then click SKU Substitutions button.
Go to SynSets Tab
Click on the Sets (Synsets) tab.
Export Data
Use the DataTables buttons above the grid:
Default filenames use the pattern synsets_YYYY_MM_D__HH_mm_ss plus the file extension. Exports are limited to 5,000 rows per download; if there are more records, narrow filters and export again.
Filter Before Export (Optional)
Apply filters to the table to export only specific SynSets before clicking the export button.
You can download CSV templates for creating SynSets:
Open Upload Sets (Synsets)
From SKU Substitutions → Sets (Synsets), click Upload SynSet. The page title is Upload Sets (Synsets).
Download Template
Click Download Template and pick a template name from the list (each item downloads via the template export).
Templates
Templates define how CSV columns map to SynSet fields (for example Initial Template with synset, description, bom_sku, sku, quantity, and optionally UOM_name when UOM is enabled).
You can upload SynSets via CSV using the new upload system with field mapping:
Open Upload Sets (Synsets)
From SKU Substitutions → Sets (Synsets) tab, click the Upload SynSet button.
Prepare Your CSV File
Your CSV file should include columns for:
Upload the CSV File
Map CSV Fields (if needed)
If your CSV headers don’t match the standard format:
Configure Import Options
Process the Import
Click Process button. The system will:
Review upload history
Check the upload history table on the same page to see:
Sell multiple products as one without creating additional physical SKUs.
Inventory is automatically calculated based on component SKUs.
Create attractive bundle and kit offers to increase average order value.
Configure specific quantities, shipping methods, and custom rules for each SynSet.
Use clear and descriptive names for your SynSets that clearly indicate what the bundle contains (e.g., “Summer-Beach-Kit”, “Gift-Set-Birthday”).
Regularly identify which component SKU is limiting SynSet stock and replenish it first.
If you sell on external marketplaces, always assign a unique BOM SKU to facilitate inventory synchronization.
Validate your CSV file before importing SynSets in bulk to avoid configuration errors.
Create SynSets with products that are naturally used together to increase perceived value and sales.
Keep SynSet descriptions updated with promotion details, bundle benefits, or special instructions.
When you create a SynSet, you define:
The system calculates how many SynSets you can form based on the SKU with the lowest available inventory.
Example:
If your “Holiday Bundle” SynSet includes:
SynSet Available Stock:
Result: You can only create 25 Holiday Bundles before running out of SKU-B.
Problem: The SynSet shows stock 0 even when component SKUs have inventory.
Solution:
Problem: When trying to assign a BOM SKU, you receive an error or the system doesn’t allow it.
Solution:
Problem: When trying to add SKUs to the SynSet, they don’t save or an error appears.
Solution:
Problem: The created SynSet doesn’t synchronize with your connected marketplace (Shopify, Amazon, etc.).
Solution:
Problem: When trying to import a CSV file, you receive errors or SynSets don’t get created.
Solution:
From SKU Substitutions → Sets (Synsets), click Convert to Aliases (shown for seller-level accounts; warehouse-only views may not include this control).
Open the converter
A dialog opens: Available Sets (Synsets) to convert, with a warning that converted sets will be deleted.
Select sets
Check the rows to convert (or Select All). The list is filtered to eligible SynSets (single-component sets in the underlying query).
Pick an action
Open Actions and choose either:
Outcome
On success, aliases are created and the SynSet is removed. Errors list per Set (Synset) if a name is already used in products, translators, or UOM.
Next Steps:
See Also: